

Basketball in a physical sense, is a game of repeated high effort short duration bursts of movement. Layered on top of these high intensity movements are sport specific skills and tactics. These skills include, dribbling, shooting, passing, and defending, to name a few. Similarly, these tactics include spacing, play execution, and decision making. When a player’s fitness is poor, not only will they have a tough time keeping up with their opponents, but their ability to perform skills and tactics will also suffer. This is why the best players are not only fit, but they are specifically conditioned for the specific high intensity movements of the game. In this article you will learn about 4 of the top basketball conditioning drills to improve your fast break ability and improve your endurance.q
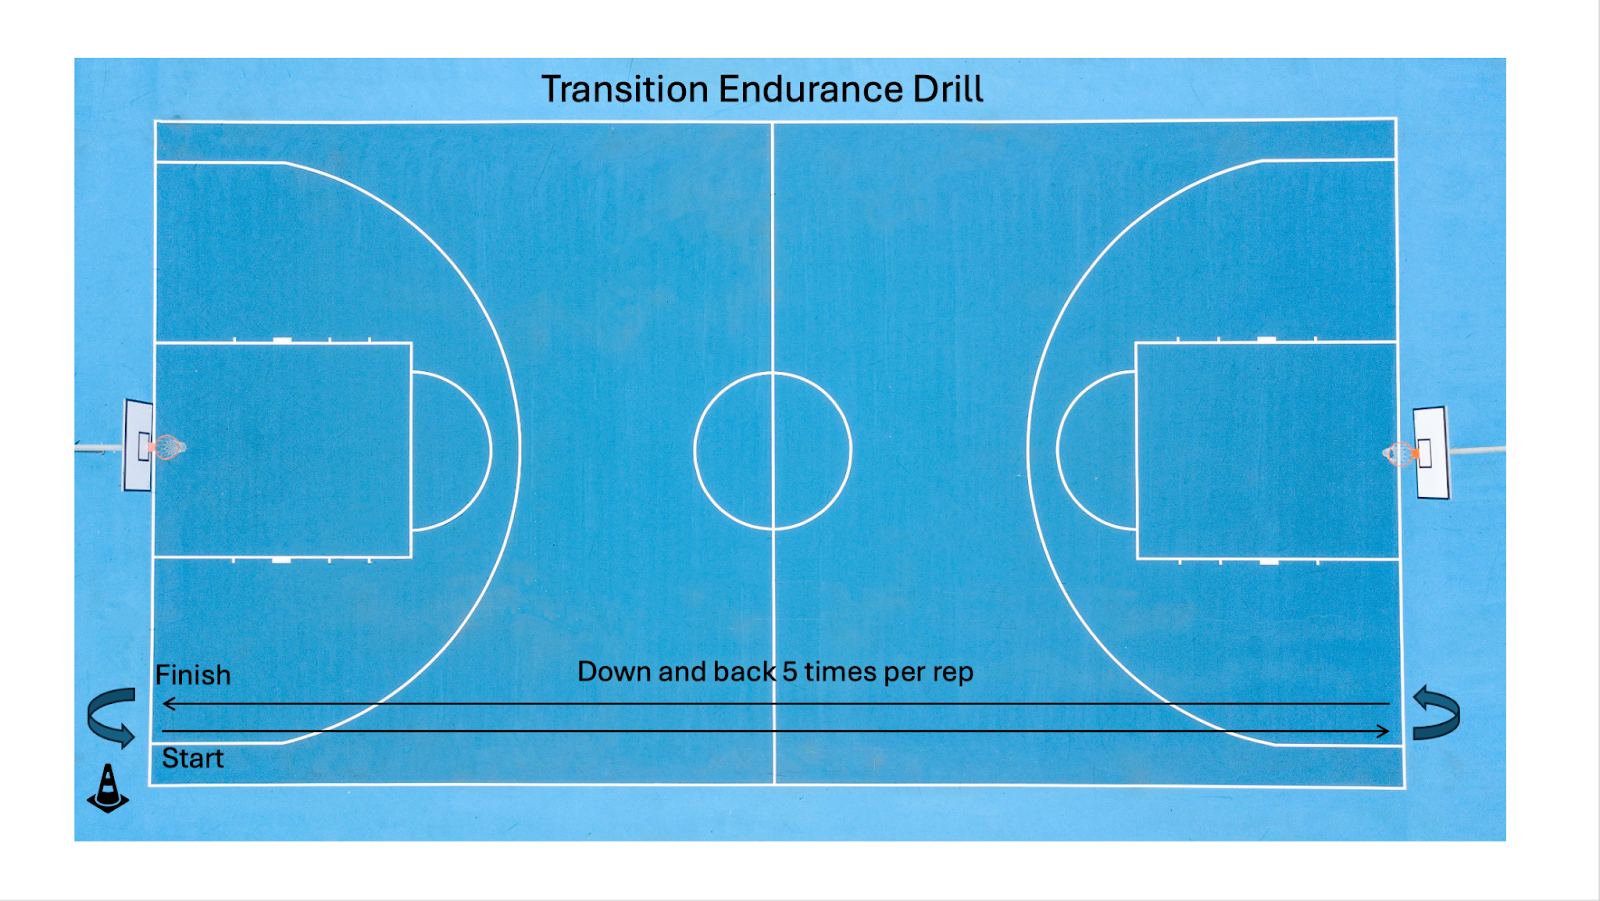
Conditioning Drill #1: Transition Endurance Drill
If you're looking for a basketball speed and conditioning drill that improves full-court sprint performance and repeat sprint ability, the Transition Endurance Drill is one of the most effective workouts you can perform. It mimics the demands of fast breaks and defensive transitions while developing anaerobic and aerobic conditioning specific to basketball.
What the Transition Endurance Drill Develops
- Acceleration Endurance - Full court sprints train sprinting efficiency and acceleration
- Anaerobic Energy System - High-intensity efforts lasting around 60 seconds stress the ATP and Glycolytic energy systems, which are critical in transition play in basketball.
- Change of Direction Ability - Quick high-intensity decelerations and accelerations improves an athlete’s transition ability.
- Improving hamstring resilience through increasing sustained running capacity
Why Transition Speed Matters
Basketball is a repeated sprint sport where transition opportunities often last 3–6 seconds and at times can have multiple efforts occur in sequence. Players who cannot accelerate repeatedly over full-court distances struggle to defend fast breaks and finish in transition. Training speed endurance with structured recovery improves both performance and fatigue resistance late in games. Furthermore, ten court lengths per repetition is an extremely high density of transition efforts and thus an athlete who is prepared for this is well prepared for even the most demanding of game situations.
What you Need for the Transition Endurance Drill
- Stopwatch or timer
- Something to record your times (phone or pen and paper)
- Full court or the length of a full court on an appropriate surface (track, turf, etc.)
What to Focus on During the Transition Endurance Drill
The focus of this drill is entirely on pushing yourself physically as there is no focus on tactical execution and very little technical execution (only on change of direction and pacing). It is important to push yourself to decelerate quickly and re-accelerate quickly out of each turn as to get the fastest time you possibly can.
How to Perform the Transition Endurance Drill
Before beginning the drill, complete a thorough dynamic warm-up to prepare your hamstrings, hip flexors, calves, and change of direction mechanics. This should include light jogging, skipping, accelerations, and short build-up sprints before you start the first timed repetition.
- Start on the baseline of a full court
- Perform 10 total court lengths (5 down and backs) as fast as possible
- Each repetition begins on a 3- minute:
- Rep 1 starts at 0:00
- Rep 2 starts at 3:00
- Rep 3 starts at 6:00
- Sprint each length with an controlled but aggressive deceleration and re-acceleration at each baseline
- Record the total time it takes to complete each 10-length repetition to the nearest tenth of a second
What to Record for the Transition Endurance Drill
Record the time that it took to complete each rep of 10 lengths to the nearest tenth of a second.
How to Pace for the Transition Endurance Drill
An appropriate pace is player specific so aim to perform the drill at a fast enough pace that you can feel your heart and lungs working by the end of each repetition. Lean toward a more challenging pace rather than more conservative. If you can barely hold onto the pace for all 10 lengths you are likely running at the right pace. If your pace drops off dramatically over the 10 lengths then you started out too fast and if you are able to speed up your pace then you probably started with a pace that was too slow. This may require a little trial and error to figure out the right pace, but it is worth it in the long run!
Tip: An easy way to set a pace once you have performed at least one session is to take your best repetition time and divide it by 10. This is how long it should take to perform each length of the court. For example, if your time was 60 seconds you would divide 60 by 10 which means that each length should take about 6 seconds. Someone can then call out every 6 seconds (6, 12, 18, 24, etc) to you as you are running so that you know if you are on pace or you can look down at the stop watch briefly as you get to each baseline.
How Frequently You Should Perform the Transition Endurance Drill
This drill can be performed 1-3 times per week, but should not be performed back to back days in order to recover between sessions. If your times are slower than usual this might mean that you are not quite recovered from your last session or you are not adequately warmed up for the drill.
How to Keep Track of Your Progress Over Time for the Transition Endurance Drill
Your goal is to improve your total time (make it go down) over 5 to 10 sessions of performing this drill. Don’t focus too much on session to session improvements, especially if you have one bad day, as there will be variance.
Remember that a slow improvement in total time (even just .5 to 1 seconds) is a great improvement, especially if you maintain it for the following sessions.
FAQ aout the Transition Endurance Drill
Q: What is a 3-minute clock?
A: A 3- minute clock means that each repetition begins exactly three minutes apart, regardless of how long the previous sprint took.
- Repetition 1 starts at 0:00
- Repetition 2 starts at 3:00
- Repetition 3 starts at 6:00
The recovery depends on how quickly you complete each repetition.
- If you finish a repetition in 58 seconds that means you will have 2:02 to recover
- If you finish a repetition in 62 seconds you will have 1:58 to recover.
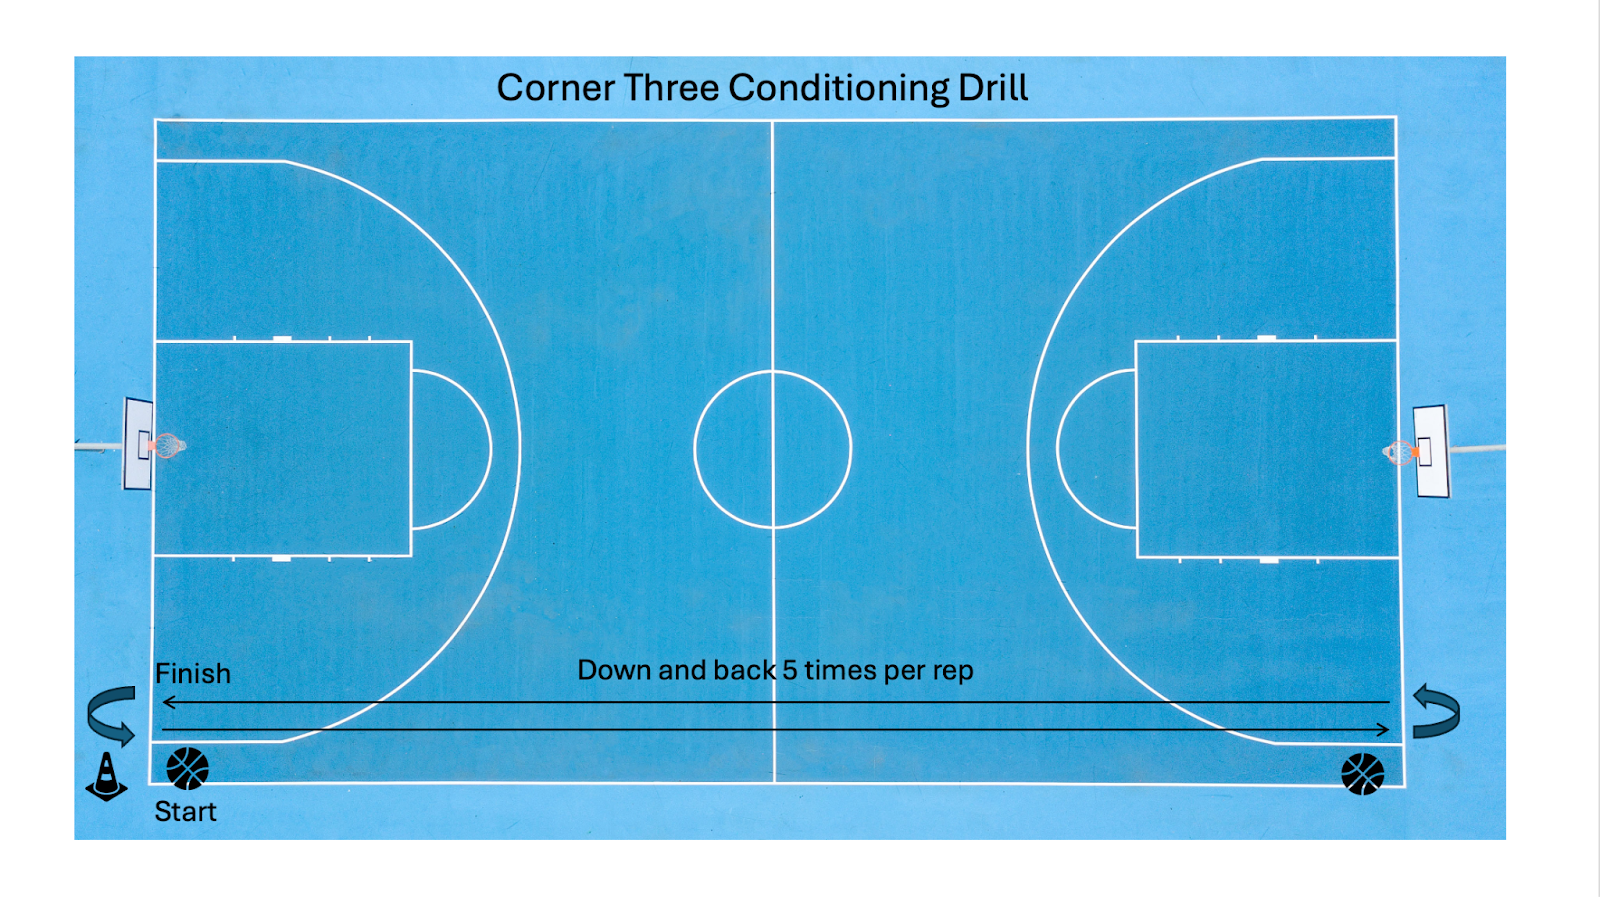
Conditioning Shooting Drill #2: Corner Three Conditioning Drill
The corner three is one of the most efficient shots in basketball and improving your ability to make corner threes under fatigue will directly impact game performance. This drill combines repeated sprint ability, anaerobic conditioning, aerobic conditioning, and shooting under fatigue to simulate in-game demands.
What the Corner Three Conditioning Drill Develops
- Repeated sprint ability: Alternating full-court sprints train the ability to perform high-intensity efforts repeatedly with limited recovery.
- Basketball-specific cardiovascular endurance – Sustained high-intensity movement mimics transition demands within games.
- Shooting mechanics under fatigue – Repeated attempts while breathing hard improves shot consistency under game-like fatigue.
- Mental resilience – Maintaining pace and focus late in each rep builds competitive toughness.
What You Need for the Corner Three Conditioning Drill
- Stopwatch or timer
- Something to record your times and shots made (phone or pen and paper)
- At least two basketballs (one for each end of the court)
- Two additional people (one for each basket to rebound and pass you the ball)
Tip: Get two teammates and you can take turns rebounding, passing the ball, and recording times and shots made for each other.
What to Focus on for the Corner Three Conditioning Drill
The focus of this drill is to develop conditioning while challenging the skill of shooting. Make sure to remember that the main focus of this, a conditioning drill, is conditioning. Which means pushing the pace is more important than slowing down to improve your shooting percentage. It is expected that your shooting percentage will drop off. This is how you will build your conditioning, which will eventually lead to better conditioning within the game, which will help improve your in game performance.
How to Perform the Corner Three Conditioning Drill
Similar to the Transition Endurance Drill before starting the Corner Three Drill complete a thorough dynamic warm-up to prepare your hamstrings, hip flexors, calves, and change of direction mechanics. This should include light jogging, skipping, accelerations, and short build-up sprints before you start the first timed repetition. Also make sure to warm up shooting, especially from where you will be shooting, the corner three.
Each rep consists of 10 alternating corner three-point shots with a full-court sprint between every attempt.
- Start in one corner of the court with a basketball
- Start a timer or stop watch
- Shoot one corner three-point shot
- Immediately sprint down the same sideline to the opposite corner
- Shoot the next corner three
- Complete 10 corner threes (5 shots on either end of the court).
- After your 10th shot record the time that it took and how many shots you made for rep 1
- Begin each rep on a 3-minute clock similar to the Transition Endurance Drill
- Complete 3 total reps, recording time and makes for each rep
Tip: Have a rebounder on each end or place 5 basketballs in each corner ready to shoot on a rack to maintain pace
How to Pace the Corner Three Conditioning Drill
An appropriate pace is player specific so either take your time from the “3 x 10s” drill below and add 15 - 20 seconds onto it (1.5 - 2 seconds for each shooting action) or just aim to perform the drill at a fast enough pace that you can feel your heart and lungs working by the end of each repetition. Lean toward a more challenging pace rather than more conservative. If you can barely hold onto the pace for all 10 shots you are likely running at the right pace. If your pace drops off dramatically over the 10 shots then you started out too fast and if you are able to speed up your pace then you probably started with a pace that was too slow. This may require a little trial and error to figure out the right pace, but it is worth it in the long run.
What to Record for the Corner Three Conditioning Drill
Record the time, to the tenth of the second, it takes to shoot all 10 shots for each repetition. This is your rep time. Your rep time may drop off between reps or it may stay somewhat consistent depending on your pace and conditioning. Add all three rep times together to get your total time.
Also, record how many shots you make in each rep (out of 10). Add them up and divide by 30 total shots. We will call this your Fitness Shooting Percentage. Aim to find an appropriate pace before recording your Fitness Shooting Percentage.
Fitness Shooting Percentage = (Total Makes Across All 3 Reps / 30) × 100
How Frequently to Perform the Corner Three Conditioning Drill
This drill can be performed 1-3 times per week, but should not be performed back to back days in order to recover between sessions. If your times are significantly slower than usual this might mean that you are not quite recovered from your last session or you are not adequately warmed up for the drill. Significantly slower could be as little as 5% slower, or in the case of a 70.0 second time, that would be going any slower than 66.5 seconds.
How to Track Your Progress Over Time for the Corner Three Conditioning Drill
Your goal is to improve your total time (make it go down) over 5 to 10 sessions of performing this drill. Don’t focus too much on session to session improvements, especially if you have one bad day, as there will be variance.
Remember that a slow improvement in total time (even just 1 or 2 seconds) is a great improvement, especially if your Fitness Shooting Percentage can be maintained.
Conditioning Drill #3: Reduced Shot Clock Format
The Reduced Shot Clock SSG is a drill that incorporates all the elements of basketball by forcing the game to move and a quicker pace. This increases the cardiovascular demand on the athlete’s bodies and challenges them to make decisions quicker than in a real game. It also increases the demands on repeated sprint ability
What the Reduced Shot Clock SSG Develops
- Basketball skills under fatigue - A shortened clock increases pace, forcing players to execute passing, shooting and ball-handling skills while fatigued.
- Basketball tactics under fatigue - Faster possessions demand quicker decision making, spacing awareness, and defensive rotations under pressure.
- Aerobic and anaerobic energy systems - Continuous play with reduced recovery challenges both the aerobic capacity and high-intensity anaerobic efforts specific to basketball.
- Repeated sprint ability - Increased transition frequency improves the ability to accelerate repeatedly with limited rest between efforts.
What you Need for the Reduced Shot Clock SSG
- A full court
- A basketball
- A shot clock
Ideally this drill is performed with 8-10 players (4v4 or 5v5) but it can be performed with less players if necessary. Keep in mind that fewer players will increase the physical demand on each player. If using a 3v3 or less player format, reduce game duration slightly to ensure the pace and conditioning intensity stays high and too much fatigue does not negatively impact the drill.
How to Perform the Reduced Shot Clock SSG
For the first time implementing this drill, keep each game to 2 minutes, especially if a 12-second shot clock is used. When athletes demonstrate the ability to maintain a high pace and quality of play, progress game duration in 30-second increments. Games should not exceed 5 minutes to ensure intensity and execution remain high. Allow at least 2 minutes of recovery between games. In most cases, 3 minutes of recovery is ideal for this format. During recovery, players can shoot free throws. This adds a useful challenge by requiring athletes to shoot while fatigued. For the first session, aim for approximately 10 total minutes of this type of gameplay. Volume can gradually be increased over time as conditioning improves.
Tip: Make corner three-point shots worth 4 points to incentivize spacing and encourage players to create that shot opportunity. This also reinforces and transfers the improvements developed in the Corner Three Conditioning Drill.
What to Focus on During the Reduced Shot Clock SSG
The focus of this specific small sided game is to increase the demand for fast breaks and the density of transition efforts by reducing the shot clock. Adjust the shot clock based on the level and conditioning of the athletes.
- 18 seconds for less experienced and less conditioned athletes
- 12 seconds for more experienced and better conditioned athletes
Reducing the shot clock increases pace, decision making speed and pressure, and transition demands throughout the game.
How Frequently to Perform the Reduced Shot Clock SSG
High intensity small-sided games like this one can be performed multiple times per week. However, they should generally not be performed back-to-back days as adequate recovery is required to maintain appropriate intensity and quality of play.
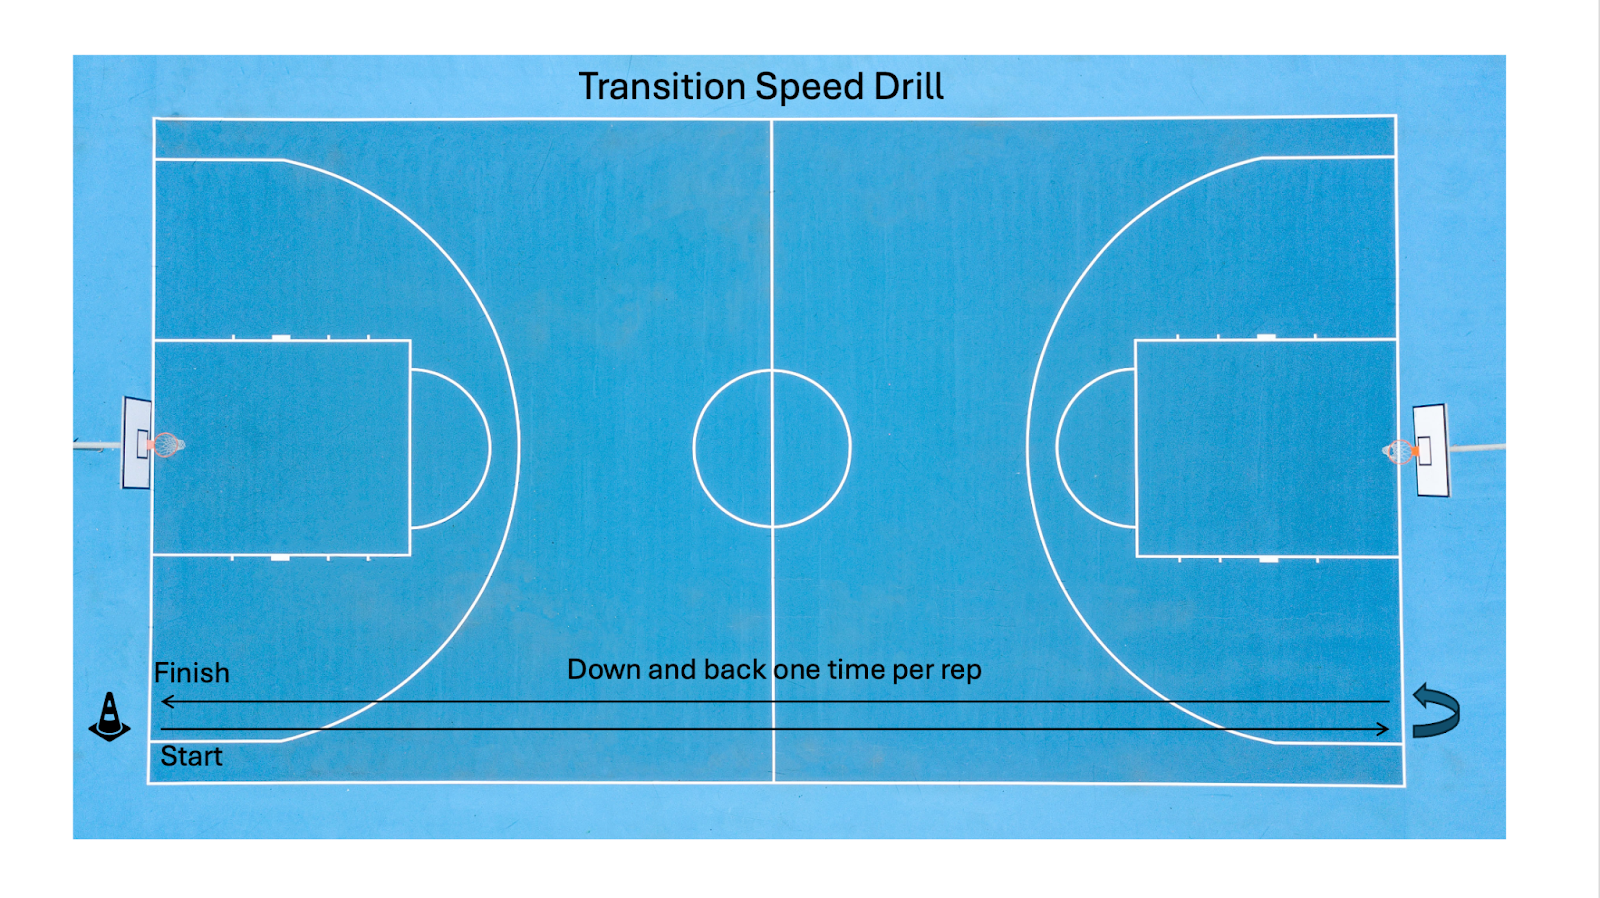
Conditioning Drill #4: Transition Speed Drill
The Max Transition Speed Drill is designed to improve an athlete's ability to cover the distance of the court. Because of its short duration it specifically targets the ATP-PCr (Anaerobic) energy system. Additionally this drill objectively measures an athlete's ability to cover the distance of the court which allows you to identify which players are better or worse and track progress on a frequent basis. It also pairs well with the Transition Endurance Drill to help determine whether an athlete needs to prioritize transition speed or transition endurance within their training.
What the Transition Speed Drill Develops
- Acceleration and fast break ability - Full-court sprints train sprinting efficiency, repeated acceleration ability
- Anaerobic Energy System - High-intensity efforts lasting around 10 seconds stress the ATP system, which are critical in fast breaks.
- Change of Direction Ability - Quick high-intensity decelerations and accelerations improves an athlete’s transition ability.
- Improving hamstring resilience through increasing hamstring high speed exposures
What to Focus on During the Transition Speed Drill
The focus of this drill is purely physical output. There is no focus on tactical execution and minimal technical execution (only on change of direction and sprinting technique). The goal is to complete each repetition in the fastest time possible while maintaining efficient sprint mechanics.
How to Perform the Transition Speed Drill
Before beginning the drill, complete a thorough dynamic warm-up to prepare your hamstrings, hip flexors, calves, and change of direction mechanics. This should include light jogging, skipping, accelerations, and short build-up sprints before you start the first timed repetition.
- Start on the baseline of a full court
- Perform 2 court lengths (1 down and back) as fast as possible
- Each repetition begins on a 1-minute clock:
- Rep 1 starts at 0:00
- Rep 2 starts at 1:00
- Rep 3 starts at 2:00
- Rep 4 starts at 3:00
- Rep 5 starts at 4:00
- Sprint each length with a controlled but aggressive deceleration and re-acceleration at each baseline
What to Record for the Transition Speed Drill
Record the total time it takes to complete each 2-length repetition to the nearest tenth of a second.
How Frequently to Perform the Transition Speed Drill
This drill can be performed 2-3 times per week and ideally after lower intensity or off days when you are fully recovered. This drill should also not be performed back to back days in order to recover between sessions. If your times are significantly slower than usual this might mean that you are not quite recovered from your last session or you are not adequately warmed up for the drill. Because of the short duration of each repetition a repetition that is only .5 to 1 second slower than normal could indicate fatigue. In this case rest for an additional minute and if that does not improve your time in the next rep it is probably best to come back to this drill on another day when you are better recovered. If you are not quite recovered you might also consider avoiding drills including high speed sprints on that day. This would include most full speed full court drills. Sticking to half court drills and play or lower intensity drills might be warranted.
How to Keep Track of your Progress Over Time for the Transition Speed Drill
Your goal is to improve your total time (make it go down) over 5 to 10 sessions of performing this drill. Don’t focus too much on session to session improvements, especially if you have one bad day, as there will be variance.
Remember that a slow improvement in total time (even just .1 second) is a great improvement, especially if you maintain it for subsequent sessions.
How to Combine all 4 Drills into Your Training Plan
The 4 drills above are all high-intensity conditioning drills and need to be strategically scheduled within a training week. These drills belong to higher-intensity training days. Because of their physical demand, include at least one lower- intensity day between sessions to allow adequate recovery. Start by incorporating two of these drills per week, alongside the rest of your training program.
A simple rule of thumb:
- If your times are getting worse, you are likely not fully recovered and this may be due to poor sleep, hydration, nutrition, or insufficient time between high-intensity sessions.
Drills like the Transition Speed Drill and the Transition Endurance Drill are excellent performance markers
- If times are improving, you are likely applying the right training stimulus
- If times are stagnant or declining, consider adjusting the total training volume or intensity to improve recovery
- If times are maintained, you are likely doing just enough to maintain speed and fitness. For example, this would be expected during the season when the focus is more on game play and execution than improving speed and conditioning.
Comparing the Transition Speed Drill and the Transition Endurance Drill
If while reading this you thought that the Transition Speed Drill isn’t quite the normal “conditioning” drill then you are ahead of the curve. This drill was added to the list because when completed alongside the Transition Endurance Drill it can be used as a diagnostic tool to better determine what you need as an athlete. Below are the results from 4 athletes.
First notice that they are ranked by who was fastest in the Transition Speed Drill. This tells you which athlete is the fastest. Athlete A, is the fastest with 9.1 seconds.
Then their Transition Endurance Drill average rep time was included. This tells you which athlete has the best transition effort endurance. Athlete B, has the best transition effort endurance with 54.5 seconds.
Then by comparing the time per length of the Transition Speed Drill’s best rep and the time per length of the Transition Endurance Drill’s average the Pace Drop Off is calculated. This tells you which athlete held their pace best. Athlete C with 9%, and athlete D, with 10% had the smallest decays in their pace.
Looking at this you can conclude that athlete A needs to spend more time working on their endurance or using the Transition Endurance Drill. Athlete B is the most well rounded of the group. Athlete C could spend some more time working on their speed or by using the Transition Speed Drill. Athlete D clearly needs to improve their speed and should use the Transition Speed Drill, but also could work on improving their endurance as well by using the Max Transition Endurance Drill. In some cases on a hard day athlete D might perform the Transition Speed Drill and then also perform the Transition Endurance Drill.
Transition Speed Drill Best Rep Time (TSD)
TSD Time Per Length
Transition Endurance Drill (TED) Average Rep Time
TED Time per length
Pace Drop Off
Athlete A
9.1
4.6
62.2
6.2
27%
Athlete B
9.3
4.7
54.5
5.5
15%
Athlete C
10.1
5.1
55.5
5.6
9%
Athlete D
11.0
5.5
61.0
6.1
10%
Athlete with the best fast break ability
Athlete with the best transition effort endurance
Athlete who is best able to maintain their fast break ability
Conclusion
These four drills are more than drills, they are a roadmap. The Transition Speed and Transition Endurance drills help you identify whether you need more top end transition speed, more repeated endurance, or a better balance of both. The Corner Three drill and Reduced Shot Clock games make sure that your conditioning transfers directly to real basketball skills and play. Train hard, recover well, and record your times because what you measure is managed and what you manage, you can improve.
.svg)
